You can automatically send orders from your Webflow store to Printful for production using Make. While this guide focuses on Make, you can apply similar principles to connect your Webflow store to Printful using Zapier, Gumloop, or other automation platforms.
Before you get started
Make sure you have a Webflow site with an
Ecommerce site plan. You’ll
also need:
-
your Webflow site ID, which you can retrieve via the
Sites API
or from Site settings > General > Overview
-
products set up in your Products Collection
-
a Make account
-
a Printful account
-
your
Printful API key
-
products set up in Printful
How to set up Webflow products
Important
Your Webflow product variant SKUs should exactly match Printful’s sync_variant_id values. The sync_variant_id serves as a unique numerical identifier for each Printful product variant (e.g., 4752058849) and can be retrieved through the Printful API or through the open source Printful-Webflow Product Sync tool.
To set up your products, first get the variant_sync_id for each Printful product variant using the Printful API or the open source Webflow-Printful Product Sync tool. Then, in Webflow:
- Go to CMS panel > Ecommerce > Products
-
Set each product variant’s SKU to match its corresponding Printful
sync_variant_id in the Variants section
- Double-check that all products have matching IDs
How to connect Webflow and Make via webhook
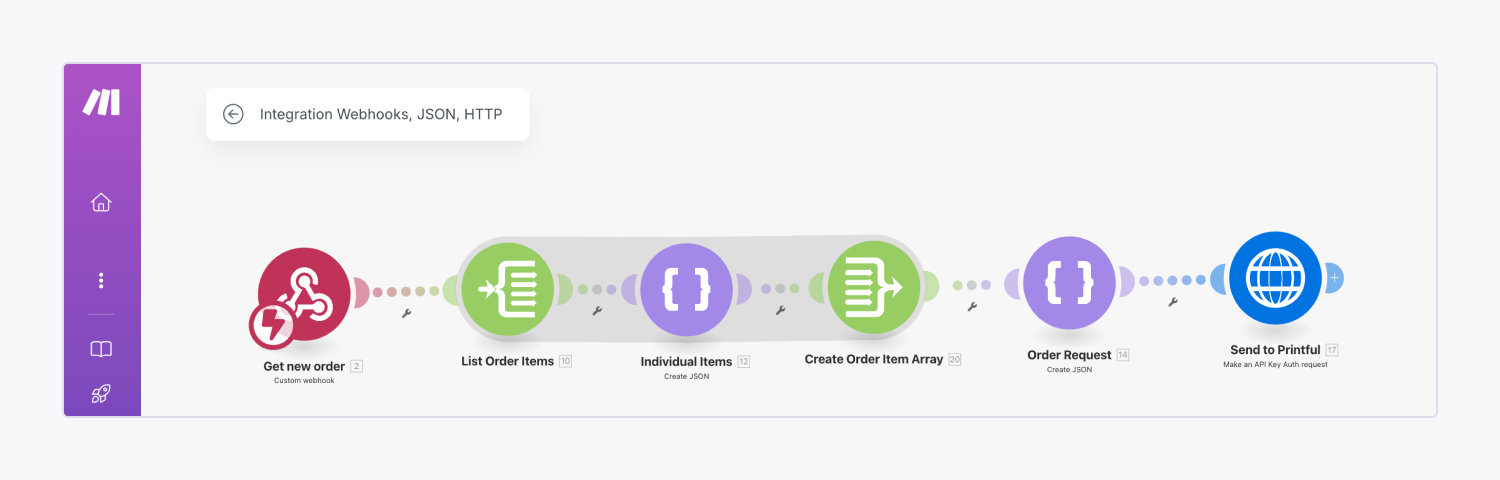
To connect Webflow and Make using a webhook, go to your Make team dashboard click Create a new scenario. Then:
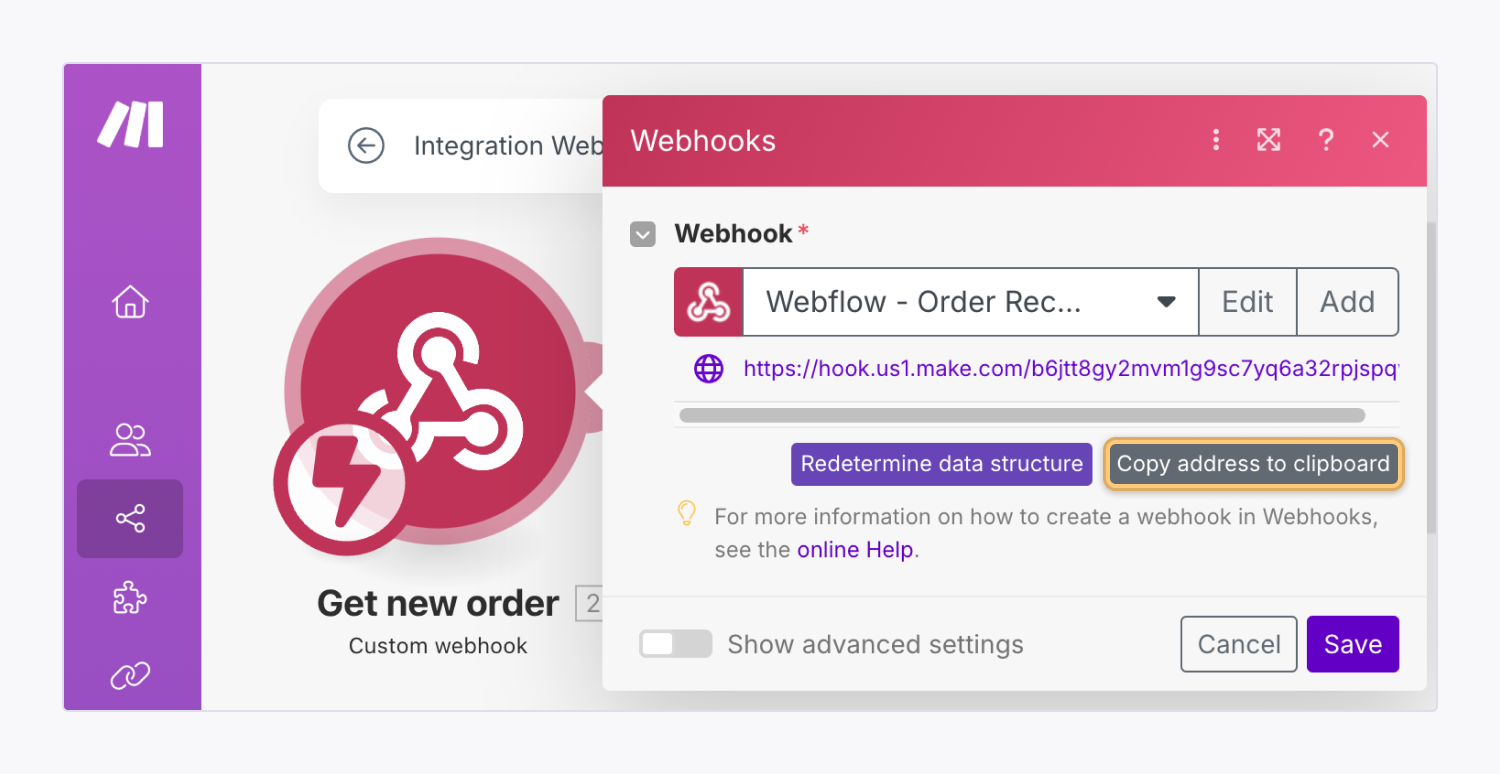
- Choose Webhooks from the list of all apps
- Choose Custom webhook
- Click Create a webhook and give it a name (e.g., “Webflow order received”)
- Click Save
- Click Copy address to clipboard to copy the generated URL and keep this tab open!
Pro tip
You can rename your modules (e.g., “Get Webflow order,” “Send to Printful,” etc.) to more efficiently identify them as you work through the steps in this guide. To do this, right-click each module and choose Rename.
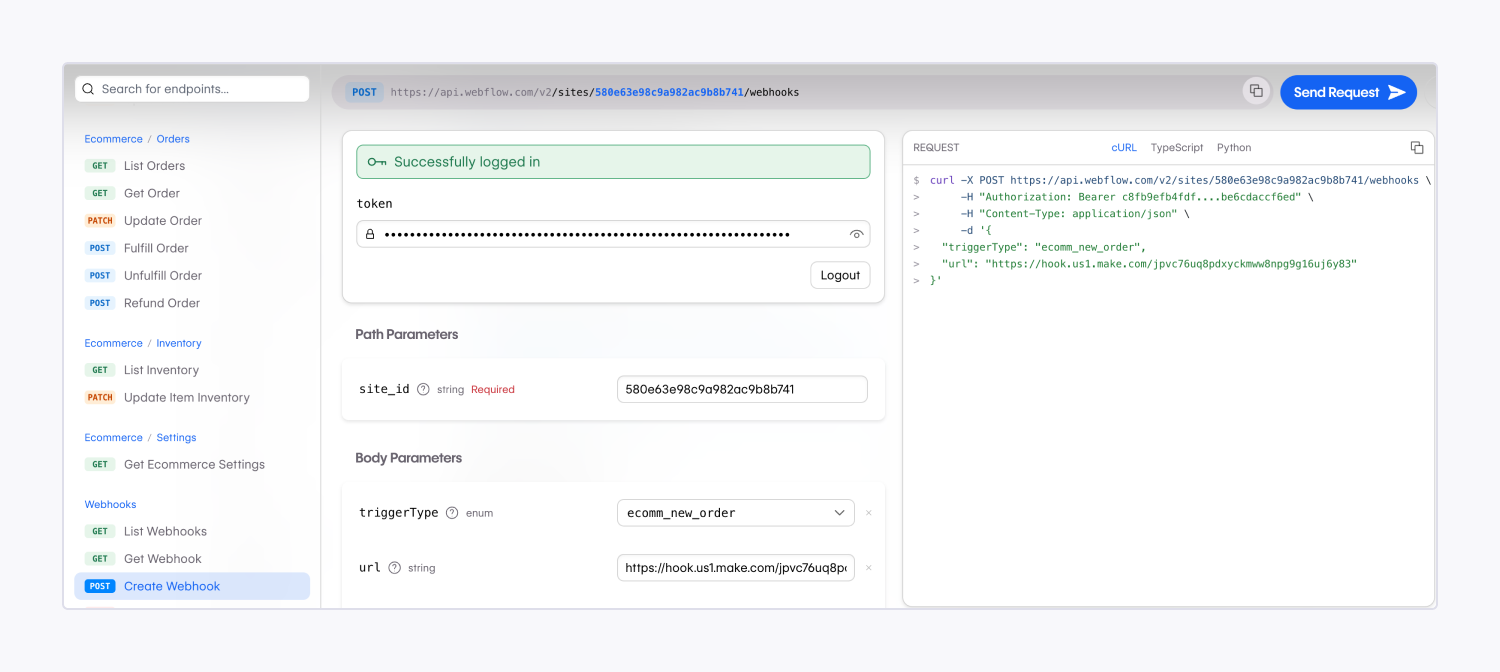
Next, open a new tab and visit Webflow’s developer documentation on creating a new webhook. Note that you’ll need to click Login to log in to Webflow and authorize the Webflow Developers site in your Workspace in order to send a real request.
Then, in the API playground:
- Add your
site_id as the Path parameter
- Choose
ecomm_new_order as the Trigger type
- Paste your webhook URL from Make in the URL field
- Click Send request
Finally, go back to your Make scenario, right-click the webhook module, and choose Run this module only. The webhook will start listening for new orders to your Webflow site.
To confirm the connection was successful, you can create a test order with Printful products on your Webflow site and verify the order data (i.e., the payload) appears in Make.
How to prepare, format, and combine your order data for Printful
Prepare all items in an order
Next, you’ll need to add a Flow control module to your Make scenario to process each item in an order:
- Go back to your Make scenario
- Click the “plus” icon to add another module
- Choose Flow control
- Choose Iterator
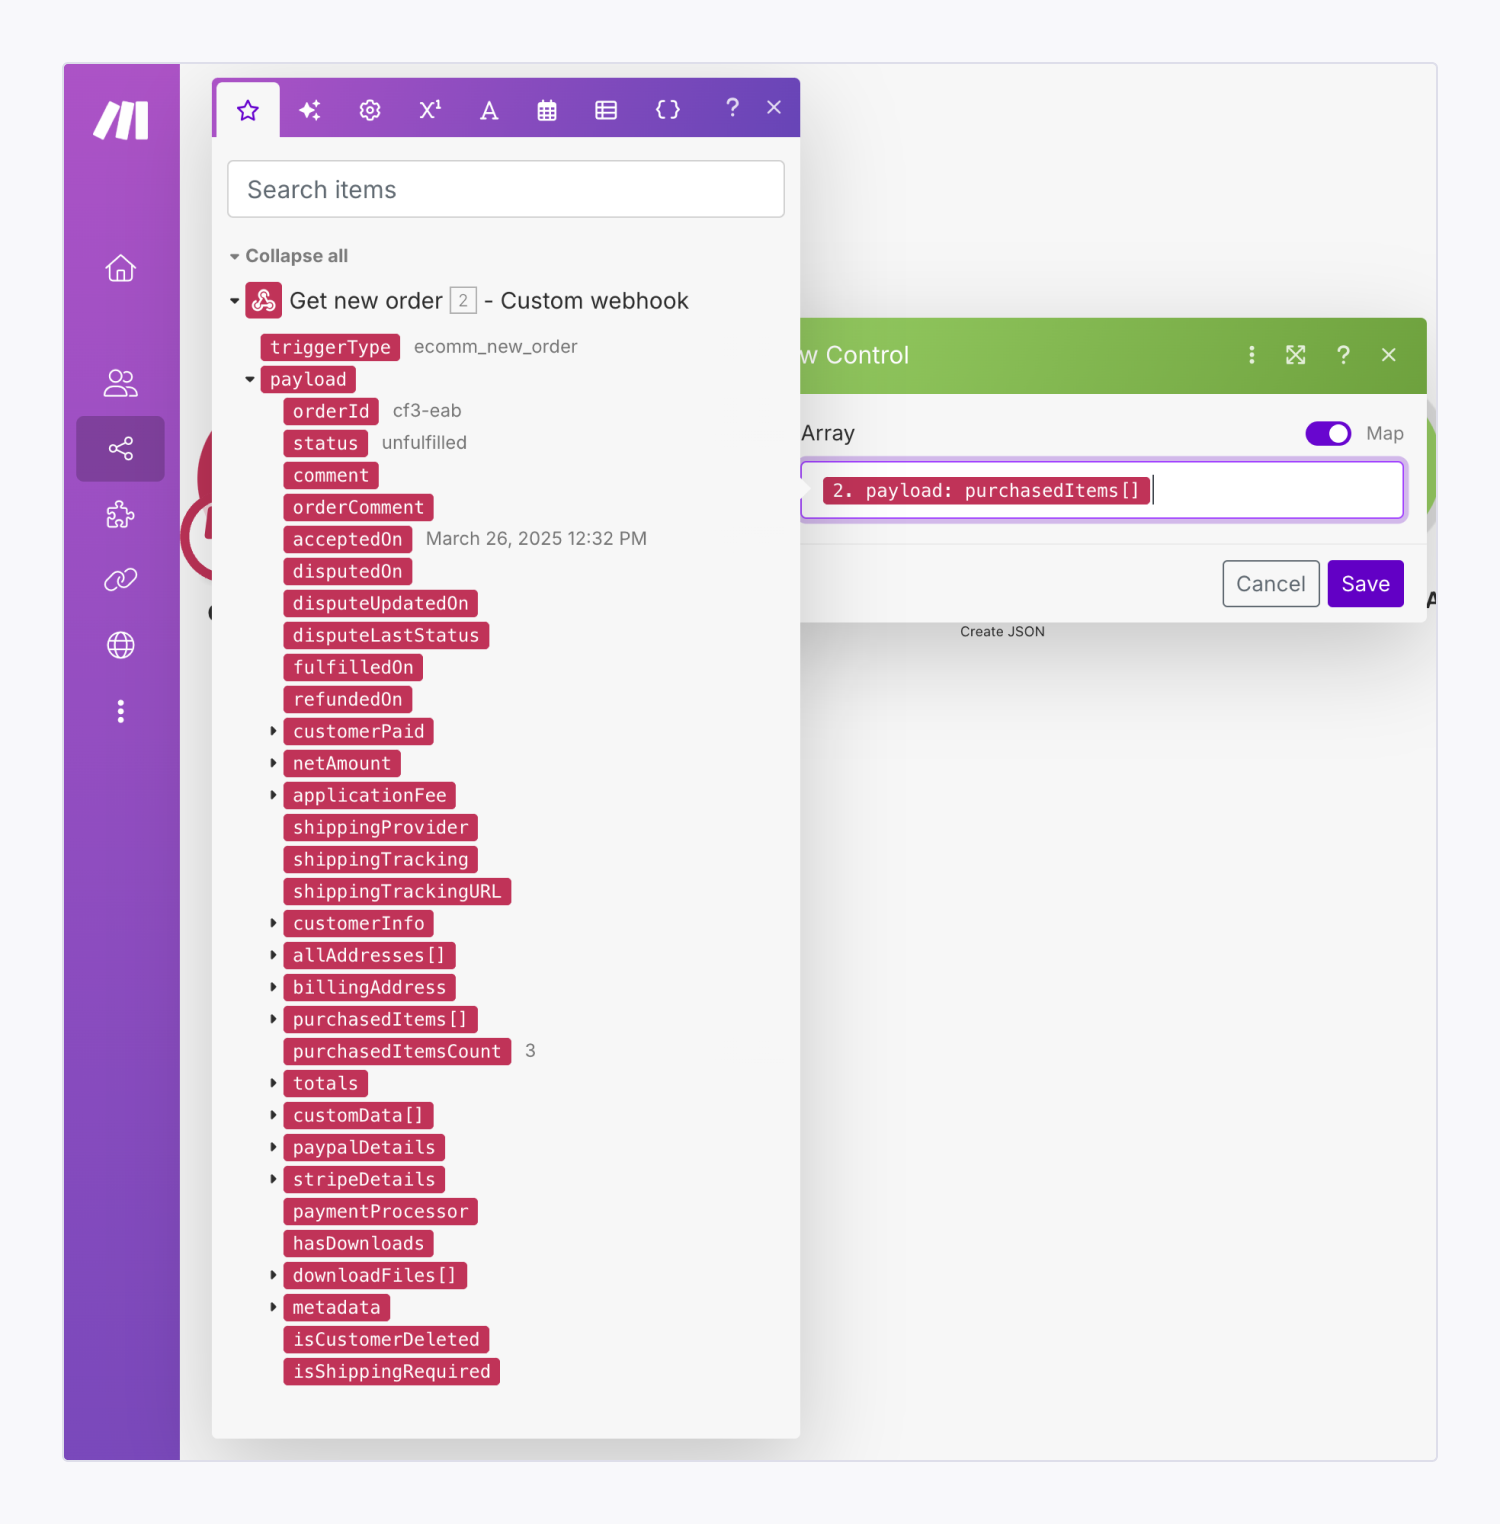
-
Click into the Array field and choose
payload.purchasedItems[] from your Webflow order data
- Click Save
Format each item in an order
Printful requires that each order item sent via the Printful API includes its sync_variant_id and quantity. To format each order item according to Printful’s requirements, create a new data structure in Make:
- Go to your Make scenario
- Click the “plus” icon to add another module
- Search for JSON and choose Create JSON
-
Click Create a data structure and give it a name (e.g.,
order_item)
- Click Add item under Specification
-
Enter
sync_variant_id in the Name field
- Choose Number from the Type dropdown
-
Click Add item below the
sync_variant_id specification you just created
-
Enter
quantity in the Name field
- Choose Number from the Type dropdown
- Click Save
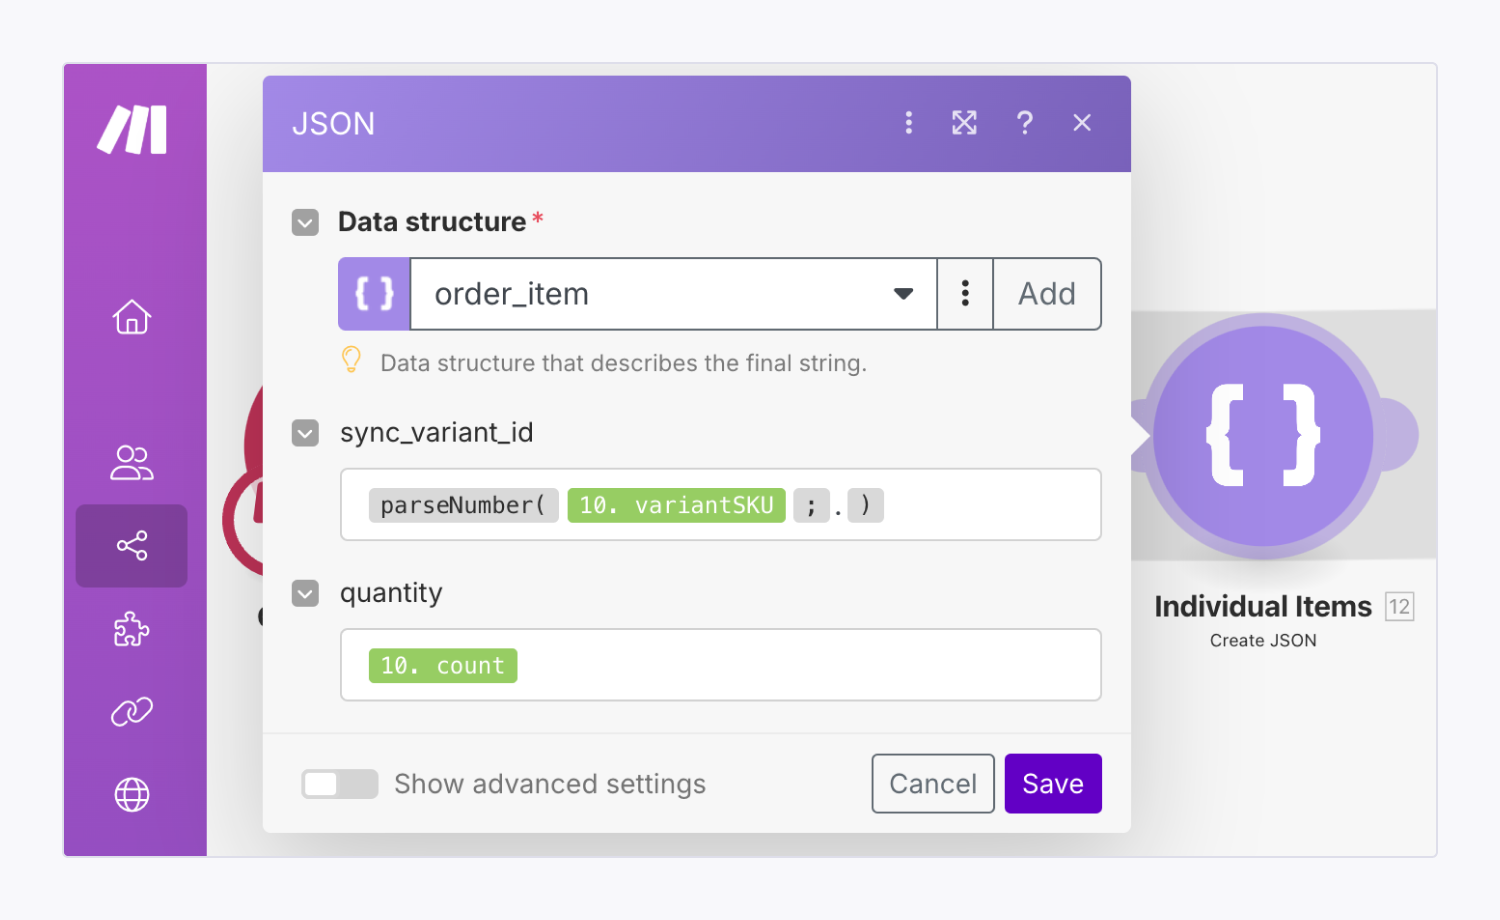
Then, fill the data structure:
-
Type
parseNumber( in the sync_variant_id field
- Choose
variantSKU from the data from the module you created to process each item in an order, then add ;.) to the end of the field — the field should look like: parseNumber(10. variantSKU;.)
-
Click into the
quantity field and choose count
- Click Save
Note
You must convert Webflow SKUs to numbers matching Printful’s sync_variant_ids to comply with Printful’s API requirements.
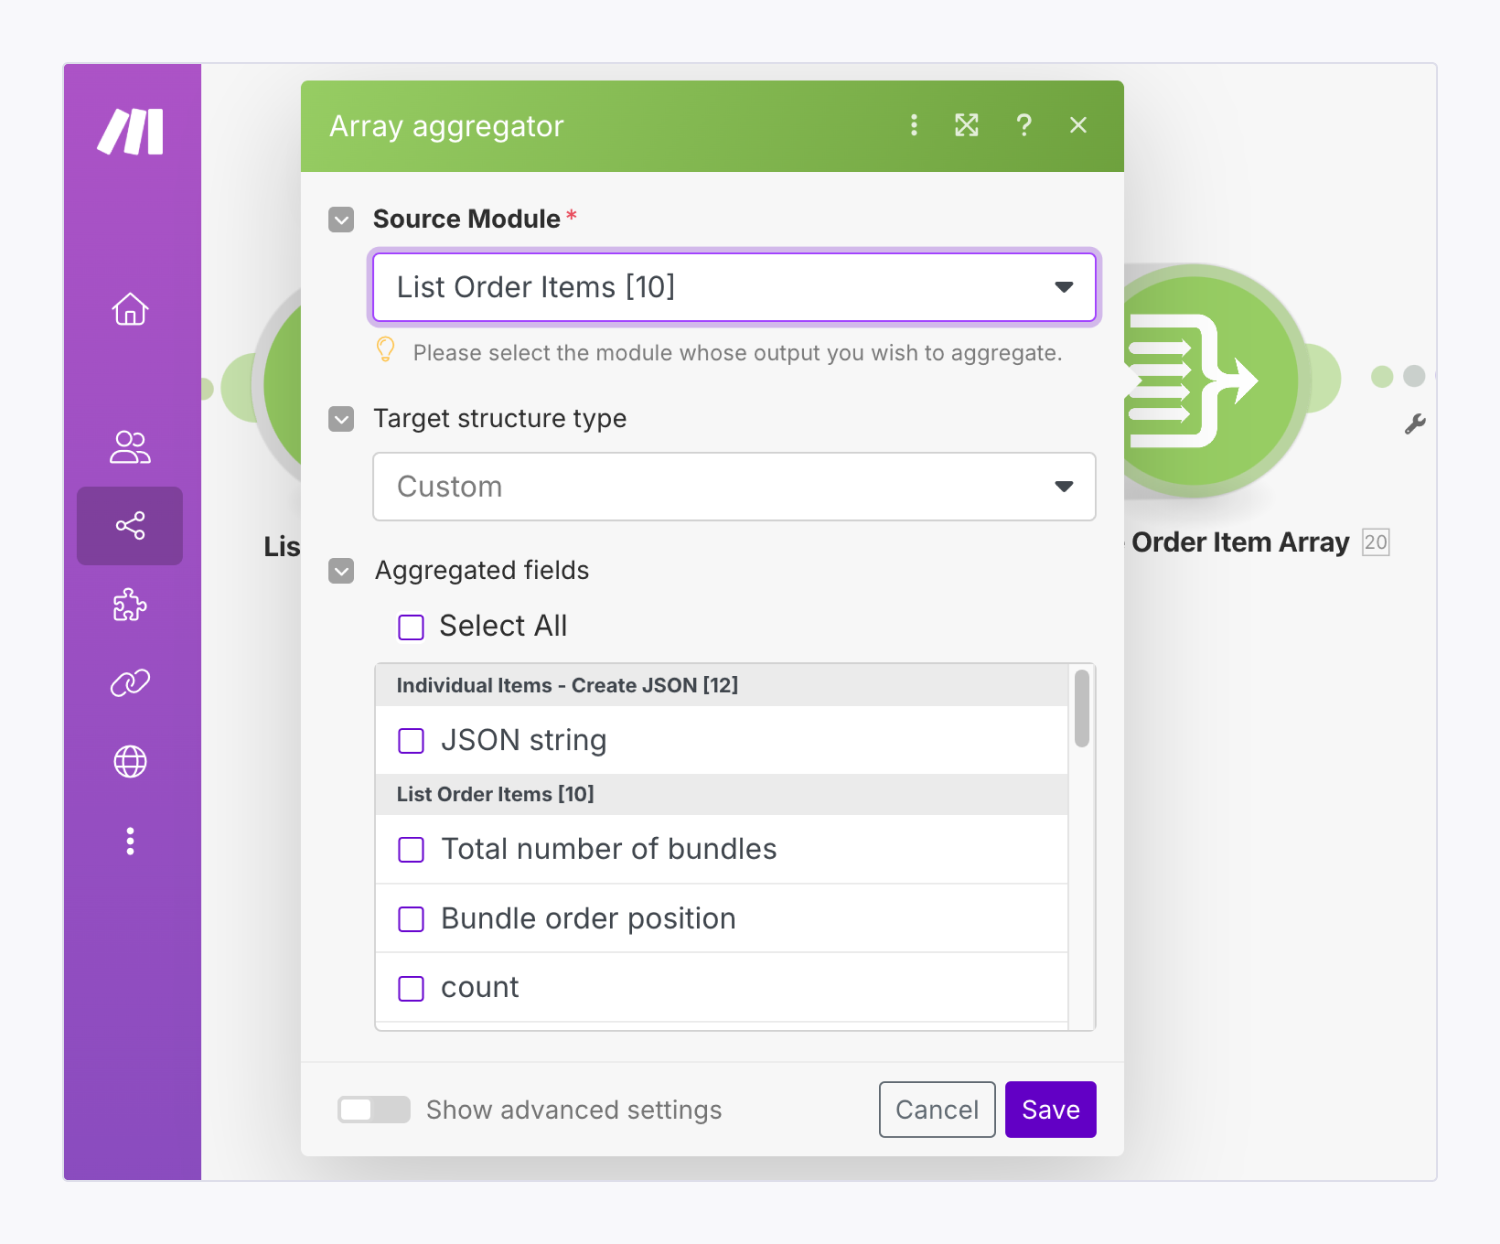
Then, create a module that puts all the order items together:
- Click the “plus” icon to add another module
- Choose Flow control
- Choose Array aggregator
- Choose the previous module (i.e., the JSON module you just created) as the Source module
- Choose Custom from the Target structure dropdown
- Click Save
How to create and send a complete order to Printful
Create a complete order
Before your Make scenario can send orders to Printful, you’ll need to create a data structure representing a complete order:
- Go to your Make scenario
- Click the “plus” icon to add another module
- Search for JSON and choose Create JSON
- Click Add to create a new data structure and give it a name (e.g.,
printful_order)
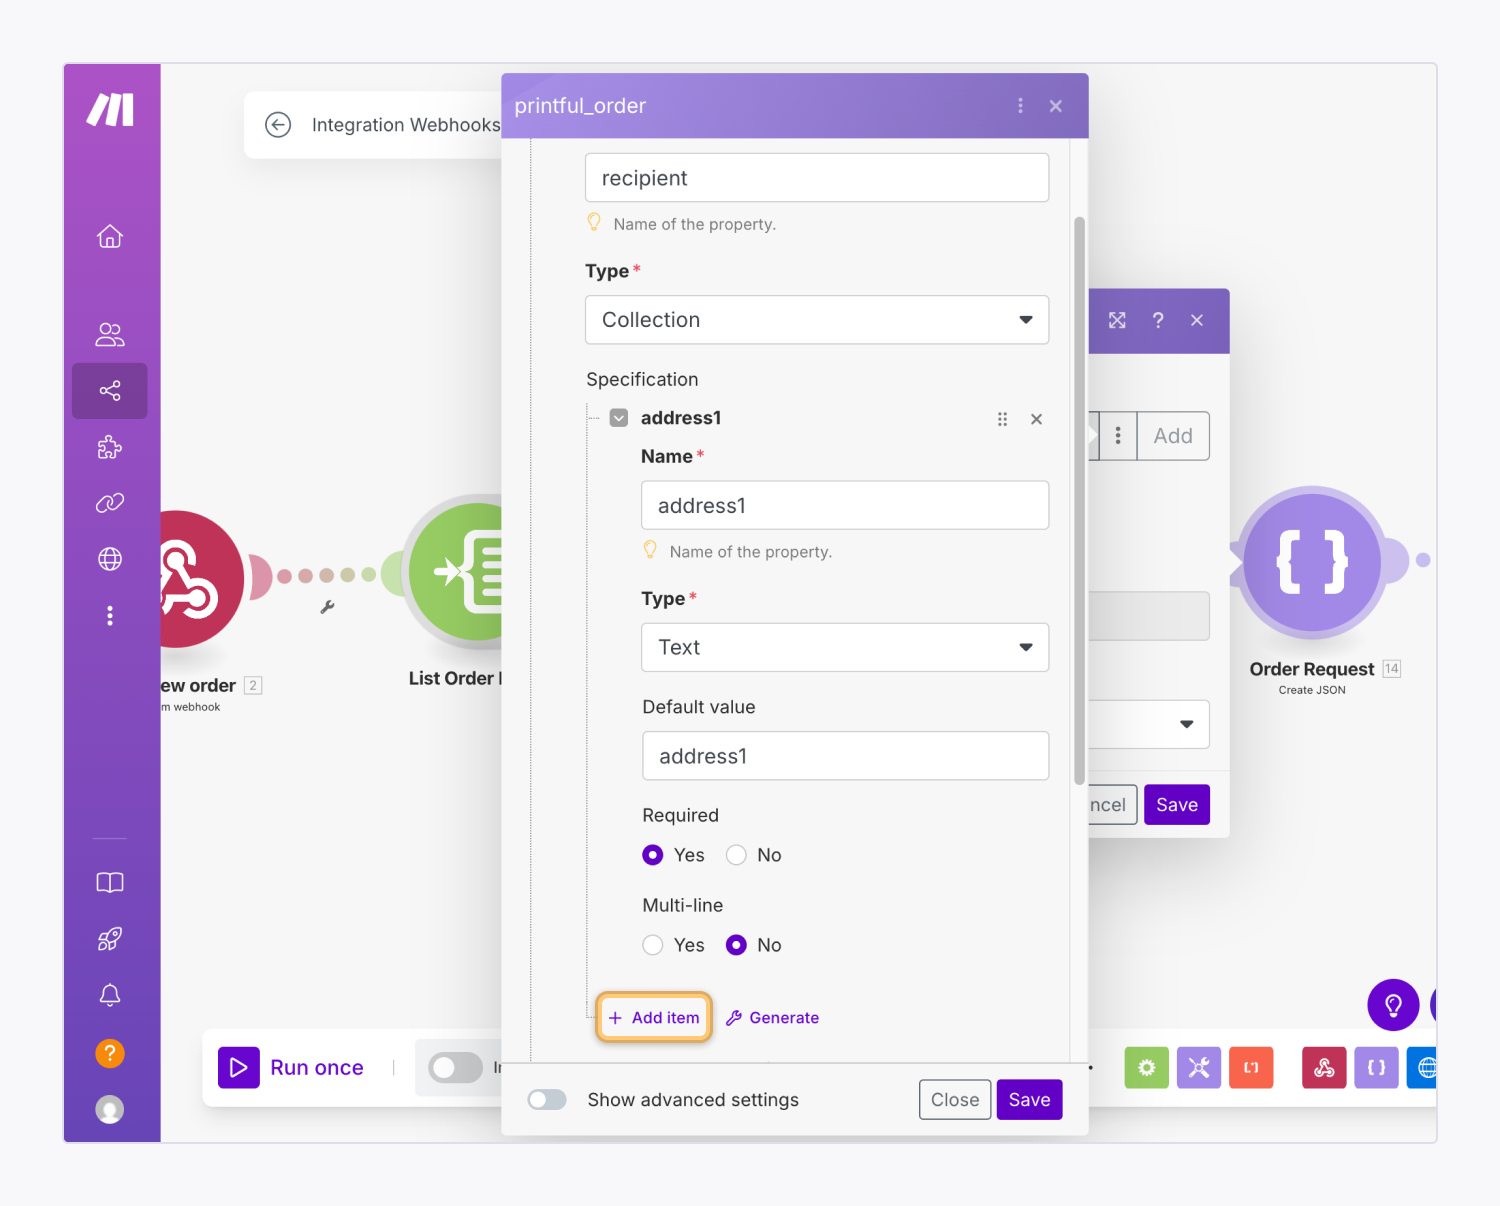
- Click Add item under Specification
- Enter
recipient in the Name field
- Choose Collection from the Type dropdown
Then, nested inside the recipient specification, click Add item and add the following specifications:
| Specification |
Type |
Required? |
address1 |
Text |
Yes |
address2 |
Text |
No |
city |
Text |
No |
state_code |
Text |
Yes |
country_code |
Text |
No |
zip |
Text |
No |
name |
Text |
No |
email |
Text |
No |
Once you’ve added specifications related to the order recipient, click Add item outside of the recipient specification and add additional order specifications:
- Enter
external_id in the Name field
- Choose Text from the Type dropdown
- Click Add item
- Enter
order_items in the Name field
- Choose Array from the Type dropdown
- Choose Collection from the Array Item Specification Type dropdown
- Click Save
Map Webflow data to Printful fields
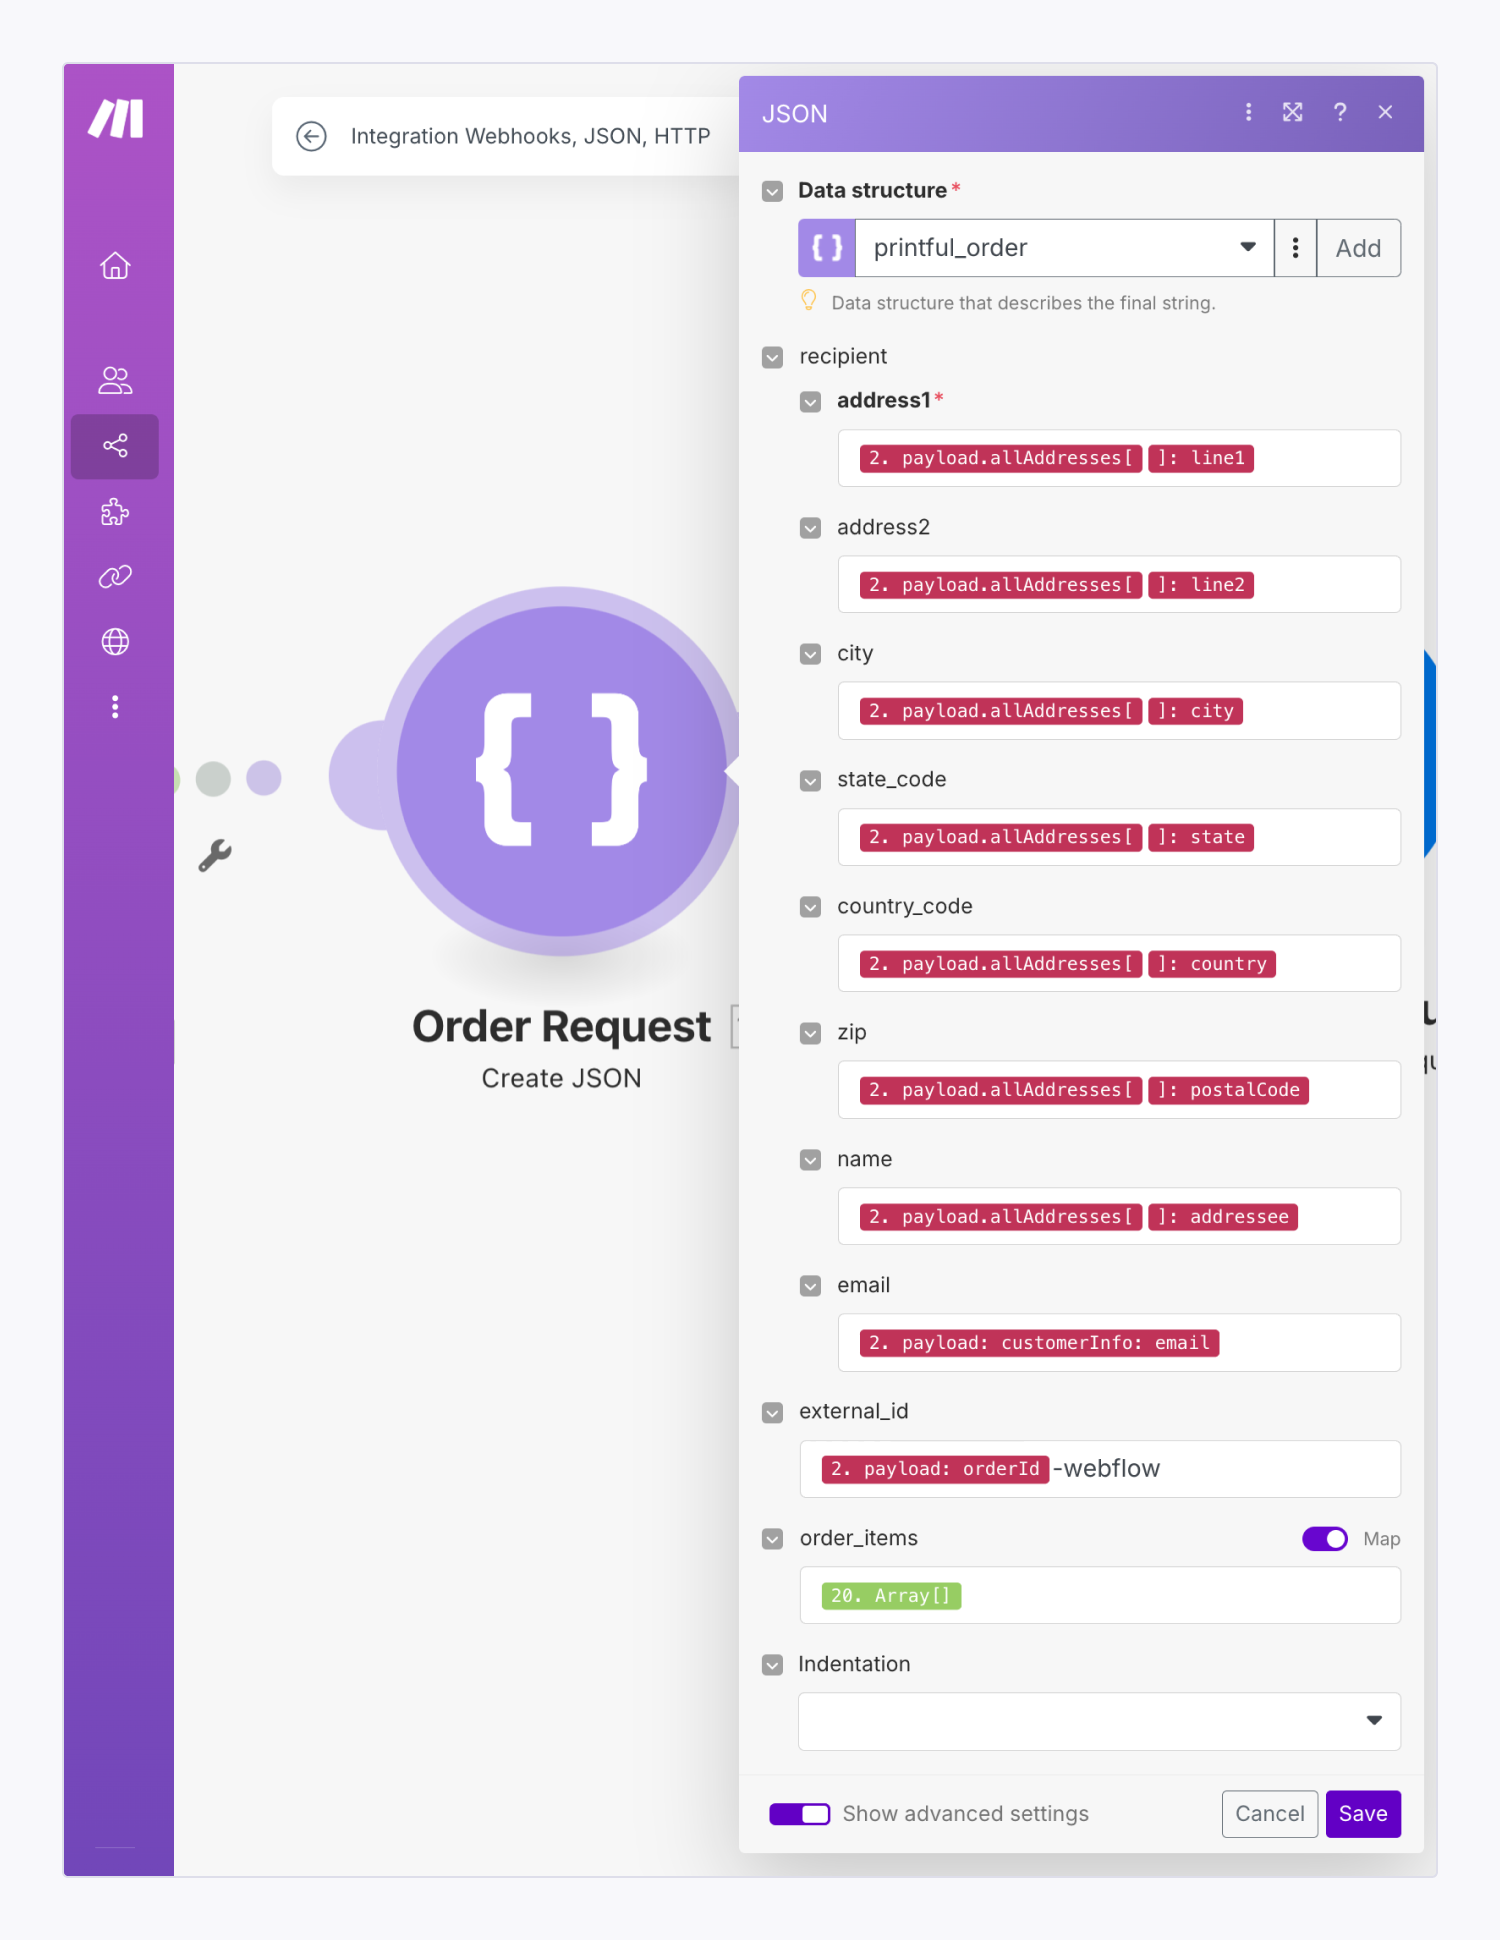
Once you’ve saved your new data structure, map your Webflow data to Printful fields:
- Click into the
address1 field and scroll down to Webhooks
- Click the “expand” arrow next to payload and again next to
allAddresses[]
- Choose
line1
- Repeat the above steps to match the following Webflow order data to Printful fields:
| Field |
Order data |
address2 |
line2 |
city |
city |
state_code |
state |
country_code |
country |
zip |
postalCode |
name |
addressee |
Then:
- Click into the email field and click the “expand” arrow next to customerInfo
- Choose
email from customerInfo
- Click into the
external_id field and choose orderId from payload
- Add
-webflow to the end of the external_id field — the field should look like: 1. payload: orderId-webflow
- Toggle Map to on next to the
order_items field
- Click into the
order_items field
- Choose
Array[] from from the Array Aggregator module you created previously
- Click Save
Send an order to Printful
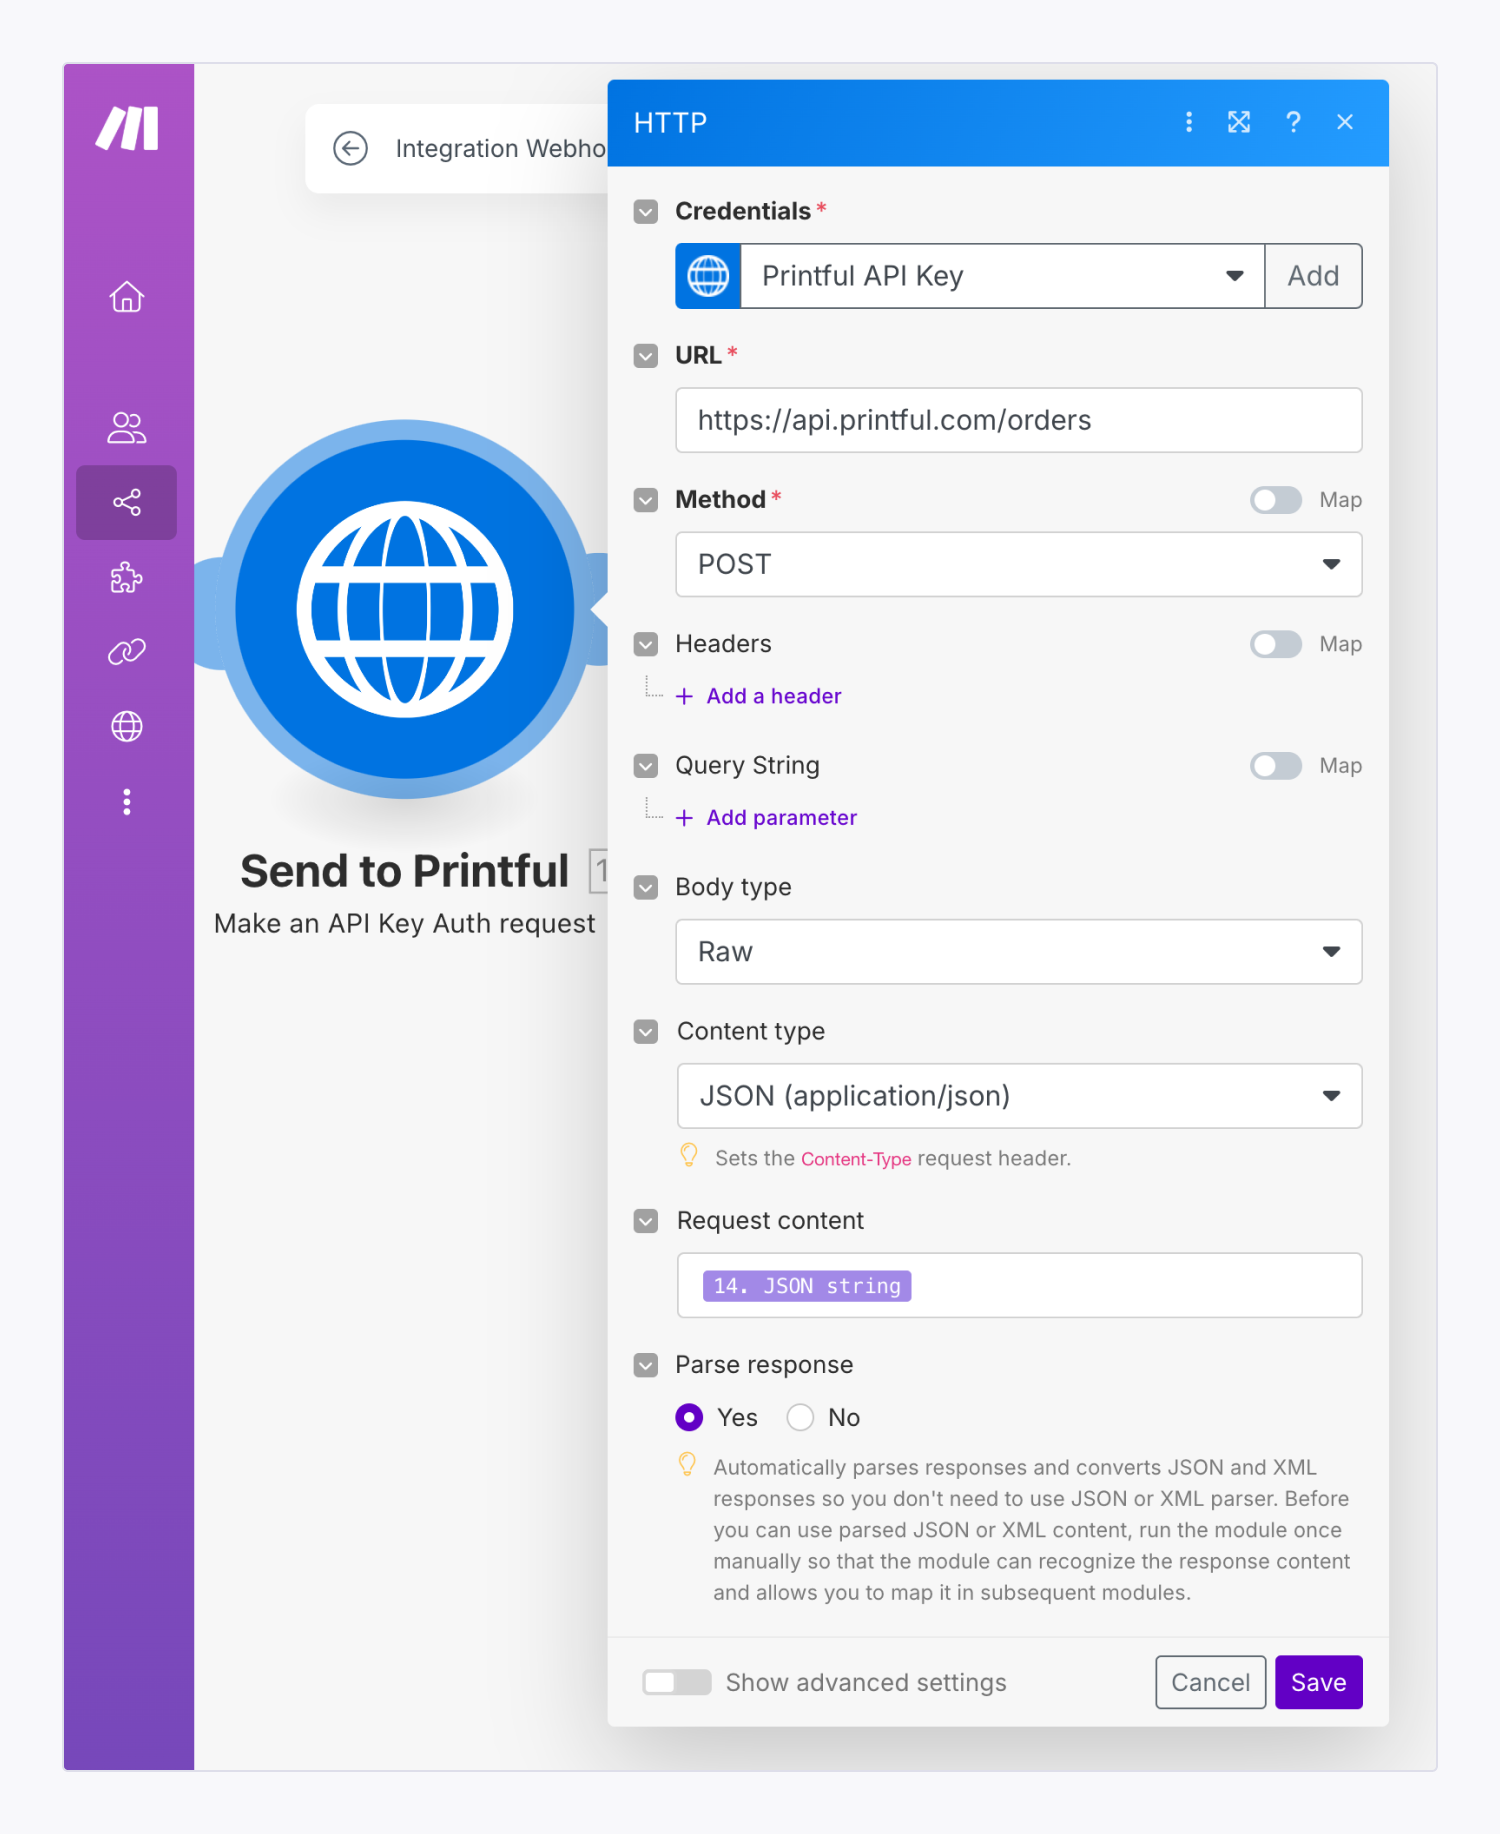
Finally, create a module that sends orders to Printful:
- Go to your Make scenario
- Click the “plus” icon to add another module
- Search for HTTP and choose Make an API Key Auth request
- Click Create a keychain in the Credentials section and give your keychain a name (e.g., “Printful API key”)
- Paste your Printful API key in the Key field in the following format:
```Bearer YOUR_API_KEY_HERE```
- Choose In the header from the API Key placement dropdown
- Enter
Authorization in the API Key parameter name field
- Click Create
- Enter
https://api.printful.com/orders in the URL field
- Choose POST from the Method dropdown
- Choose Raw from the Body type dropdown
- Choose JSON (application/json) from the Content type dropdown
- Click into the Request content field and choose the JSON string you set up in the previous steps
- Choose Yes from the Parse response options — this lets you see Printful’s response after you send the data
- Click Save
How to test the integration
To ensure your integration is working as expected, you can create a test order in your Webflow store, watch the scenario execute in Make, and verify the order appears in your Printful dashboard. You can review the API responses in Make by clicking the numbers that appear above each module in your scenario.
FAQ and troubleshooting
My orders aren’t appearing in Printful.
If your orders aren’t appearing in Printful, try the following troubleshooting steps:
- Double-check that your product SKUs exactly match Printful’s
sync_variant_id values
- Confirm your API key is valid and active
- Make sure your API key is structured as
```Bearer YOUR_API_KEY_HERE```
- Check that all required fields contain data
I’m getting invalid variant errors.
If you’re experiencing invalid variant errors:
- Double-check that your product SKUs contain only numbers
- Verify all products exist in your Printful catalog
I’m getting address validation errors.
If you’re experiencing address validation errors, make sure you’re collecting two-letter state codes (e.g., CA, NY, etc.) and standard country codes (e.g., US, CA, etc.).